Social media news of the day: Pinterest just rolled out their own version of analytics. While this is something 3rd party platforms have been doing for a while, having integrated analytics on the Pinterest site will make tracking statistics much easier for Pinterest users.
I decided to take the plunge, and it's kind of neat!
So how do you get started?
First:
VERIFY YOUR WEBSITE
Only top-domain websites (ie: www.moderndaydonnareed.com) can be verified. I was slightly confused as to how to do this at first, but quickly figured it out. For those on Wordpress or other hosted websites, this guide on how to verify your website via HTML file upload is very helpful.
But since I am on Blogger, it was a little more involved.
Instead of uploading a file (since I have no idea how to do this, or if I even CAN do this on Blogger), I decided to verify by inserting an HTML meta tag. Does that sound like greek to you? It's actually pretty simple. Here are steps to help (I'm using my sites and a site I manage for visuals):
1) Go to your Pinterest page.
2) In the upper right-hand corner, click your profile icon. A drop-down option box will appear. If you haven't already, opt to Switch to the New Look (it will be at the bottom of the list).
 |
3) Go to your profile under the New Look. There will be a pencil/edit icon on the bottom left corner of your profile box. Click this to edit.
4) If you've entered your blog/website, there will be an option to "Verify Website." Click this. (Note: Make sure you take off the "http://www" from the beginning of your URL. So for example, it should read moderndaydonnareed.com as opposed to http://www.moderndaydonnareed.com. It kept giving me an error until I changed this).
5) It will automatically give you the option to download a verification file. At the bottom, on the left, it will give you the option (in red) to Verify with a Meta Tag. Choose this.
6) Copy the code that is given in the box.

7) Open a separate window and go to your Blogger dashboard.
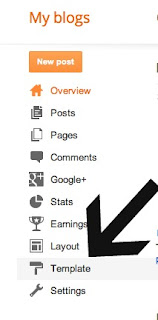
8) On your left side bar, choose to go to TEMPLATE

9) Under the cute image of your blog, click "Edit HTML"
10) A box will pop up with a bunch of code. Under the title there is a little box next to the words "Expand Widget Templates." Click this box so it is checked.
11) Find the tag of your code. It should be close to the top. It is highlighted below in blue.
13) DIRECTLY under the code, paste the meta tag verification code you copied from Pinterest. You'll see I did this below and it is highlighted in blue. (Note: if you get a red error, type and add it to the end of your code to close it. This should fix the error).
14) SAVE TEMPLATE. SAVE SAVE SAVE.
15) Go back over to the window that you have open for Pinterest and click the big red "COMPLETE VERIFICATION" button.
16) You should be verified! This will be evidenced by the checkmark next to your website on your profile.
Now you are able to access your Analytics - which can be found under your profile drop down box (upper right hand corner again).
More on how to use Pinterest Analytics in the near future!
Are you verified on Pinterest? What do you think of the new Analytics?
And please - if you have ANY issues on trying to verify or trouble getting the Meta Tag code into your Blogger HTML, leave a comment or email me. I'm not techy, but I will do my best to help!


